 |
→ January 2006 Contents → Column
|
Curing the Still Animation Headache
Moving Pictures from Stage Tools January 2006
|
|
Size really does matter when it comes to creating high-quality animation on still photos for broadcast. In order to do good zooms and pans on a still image you need to be able to work with large digital photos - and that means lots of pixels.
In the old days a Rostrum Camera was used to animate stills. With a Rostrum Camera you get the best results panning and zooming on large, sharp images. A small photo restricts the camera moves and a grainy enlargement looks awful. Working with stills in Final Cut and Avid is like using a digital Rostrum Camera.
A 720x480 pixel dimension is the base size for working in DV. Unfortunately, a 720x480 pixel frame is not large enough to create serious zooms and pans using the Motion feature within FCP. You can import a 1440x960 pixel image if you want to try some simple 2 X moves. But, if you want a tight 3-4 X zooms you will need at least 2000 pixels to keep the picture sharp. If you start importing 2000 pixel images into your timeline, FCP will crash.
If you are just adding a few stills to a production you can get by working within FCP. But, if you are working with lots of stills and want Ken Burns-style animation the Motion feature in FCP is clumsy and frustrating.
Adobe After Effects allows you to work with large photos. But, AE is expensive and more than you need for still animation. With AE you have to work outside FCP and import the animated stills back into your timeline.
Moving Picture from stagetools.com is a dream come true for still photographers working with FCP or Avid. It is a plug-in that allows you to work with stills up to 8000 x 8000 pixels in your timeline in an extremely friendly interface. At $199 it may seem expensive, but that's $400 less than After Effects, and once you get into the grove with Moving Picture you will discover it is worth every penny.
As a FCP plug-in Moving Picture works as a video filter effect. You place a small still or a dummy video clip in the timeline and then open Moving Picture as filter.
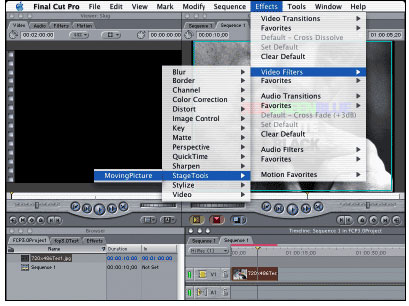
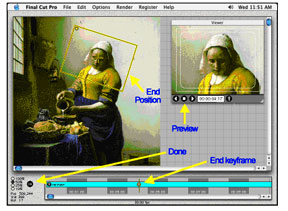
When you apply the Stage Tools filter the Moving Picture screen will appear. Load your large pixel photo and use the yellow box frame to create zooms and pans. The process is very intuitive. A timeline at the bottom lets you adjust the timing of the moves. A preview window lets you see what the animation will look like. When you are done click OK.
Back in the timeline, render the clip and Moving Picture will apply the moves using the large photo in your media files. The small photo in the timeline is unaffected and stays there to remind you of the name of the still clip with a visual thumbnail.

If you want to change your move: Go back to your still clip, apply the Moving Pictures filter, change the timing of the pan or zoom, and then render.
Creating a good digital workflow is helpful. Here is one that I use for working with Final Cut Pro:
If your project goes to an uncompressed online edit use the same folders in your online system. Your Moving Picture EDL will travel from offline to online.
Moving Pictures makes working with stills in FCP at lot of fun and a lot more productive. You can get a demo download from www.stagetools.com. They have good help and tutorials. Give it a try.
© William Campbell
|
Back to January 2006 Contents
|
|