 |
→ March 2006 Contents → Camera Corner
|
Camera Corner:
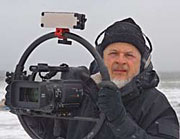
Panasonic AG-HVX-200 P2 Camcorder Review March 2006 |
 |
|
I should begin by pointing out that I'm fairly new to video. My idea of a camera has always been a Leica M6 hanging over my shoulder, and extra rolls of film in my pocket. Now, as a burgeoning documentary maker, I find myself loaded down with bags of lighting, tripods, sound equipment, and cameras. For music videos, I frequently have a whole car full of equipment for multi-camera shoots. That said, I come to the task of evaluating the Panasonic HVX-200 with a particular point of view. I like simple, rugged cameras that produce gorgeous pictures. The HVX-200 is in my comfort zone.
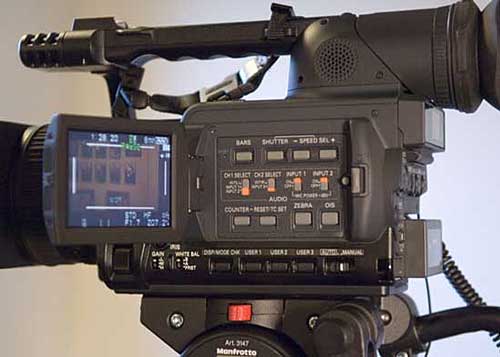
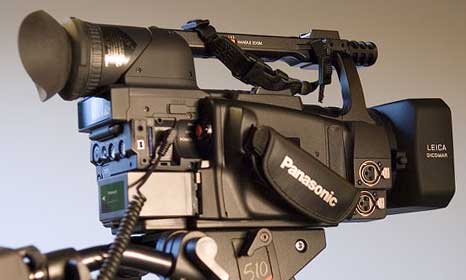
First the ergonomics: The HVX is beefy. It feels bigger than the other cameras I've used but also seems much better balanced. It's got an industrial, almost military feel about it. Before using the HVX, I'd been shooting with a Canon XL-1 and XL-2 so I'll be comparing a bit with the controls and features of these cameras. Users of Panasonic DVX cameras will be much more at home with the HVX. It looks, feels and operates like a chunky DVX-100. Compared to the Canons, the HVX-200 is more handheld and less shoulder-mount. It also feels more compact, like a cube. There are fewer adornments sticking out. I personally like this a lot. The camera fits in a smaller case than the XL-2 and feels more rugged as I'm carrying it around.
My shooting style is mostly manual and the HVX makes this very comfortable. The focus ring is smooth: although I'd prefer a physical stop on it. There's an auto-manual focus button just behind the lens. When set to manual, you can give it a momentary push to zoom-to-infinity. Below this button is a momentary button to force an autofocus. Above the auto-manual switch is a focus-assist button, which opens a zoomed-in window on the viewfinder to obtain a sharper manual focus. I found this effective, although I could focus a bit easier using the EVF rather than the LCD screen.
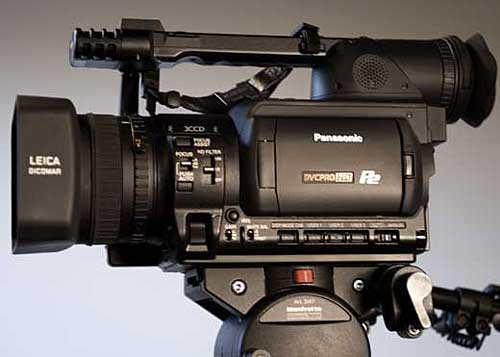
The fixed-mount lens itself is a Leica Dicomar 13X with a 35mm equivalent range of 32mm to 422mm. Century Optics is shipping a .6 wide-angle adapter and 1.6 tele-adapter with a full-zoom .75 adapter and fisheye adapter to follow. These would give you an effective 35mm range in your bag of 19mm to 675mm. All in all, the lens quality is excellent and the add-ons sufficiently flexible that I don't believe I'll miss having a removable lens. To my eye, the lens shows no objectionable qualities at any aperture. I tried the Century Optics .6 adapter, which snaps on the front of the lens in place of the lens hood, and I found minimal vignetting and an acceptable level of barrel distortion, given the very wide angle of view.
The Iris Control (I'll always think of it as aperture) is a knurled knob on the left side of the camera just behind the lens. It is large enough to be easily accessible. The F-stop is displayed in the viewfinder so you can adjust the iris without ever taking the camera from your eye. This is a consistent characteristic with all controls on this camera. From my still camera use, I have always preferred a camera such as a Leica that has controls that can be differentiated by touch rather than requiring that you actually look at the knobs and buttons. I want to be able to operate the camera manually and make any adjustments quickly and by feel. I find the ergonomics of the HVX-200 very satisfying in this regard. All controls are large, well-placed and well-thought-out. Although this camera has an enormous amount of flexibility in its adjustments, I find that the controls on the outside of the camera are ones that I am always using. There's nothing superfluous and the controls are clustered by function. For example, right over the Iris knob is the ND switch, and just behind the knob is an auto-manual Iris button. When the aperture is set to auto, you can still adjust it manually with the knob, but when the light changes auto will take over and reset the F-stop.
The three-position switch for Neutral Density ND 1/64, 1/8 and off corresponding to 7.5, 3 and 0 stops of light reduction. I find that I use this frequently to reduce depth of field. One of the biggest weaknesses of this camera, as with all 1/3" CCD cameras, is that it's very hard to throw the background out of focus unless you get very far away from your subject. Conversely, 2/3" CCD cameras use longer lenses for an equivalent field of view, and therefore offer more depth of field control. About all you can do with the 1/3" CCD cameras is open the aperture wide, go to a faster shutter or ND, shoot at maximum zoom, and hope for the best. 
Support our sponsors
The zoom ring is large, and in manual mode, is very smooth. With the XL2 I normally zoomed manually for focusing and used power zoom to get a smooth zoom effect while shooting. This is more problematic with the HVX since you need to disengage the power zoom to easily turn the manual zoom ring. Maybe I'm supposed to do this with the XL2 but I've never bothered. Here it's pretty mandatory since it feels like you are forcing the motor if you don't disengage. On the other hand, I've started using a Manfrotto control for most of my shooting. On sticks, I'm using the 522P camera control, which has three zoom speeds as well as progressive and constant zoom. On my Fig Rig, I'm using the 521P controller. Both offer me enough flexibility that I haven't been using manual zoom on this camera. Also, the power zoom seems much quieter than other cameras I've used. I've yet to hear the motor, even in a very quiet scene. The degree of zoom can be displayed in the viewfinder as either Z0-Z99, feet and inches, or meters. I haven't decided which I prefer yet, but it's nice to have the flexibility.
One nice feature of the viewfinder is that the 16x9 image is displayed inside a 4:3 frame. So data like aperture, zoom, shutter speed, etc. is displayed mostly above and below the image. This makes it much easier to leave this data showing and still see enough of your scene to shoot.
At the bottom of the camera there are three buttons labeled USER1, USER2 and USER3. These can be used as shortcuts for settings, such as fade in and fade out. Frankly, I don't find these buttons very useful. I would much rather see them be able to do functions like remember a zoom position, or remember a focus setting.
Behind the flip-out 3.5" viewfinder, there are more controls including shutter speed select, SMPTE color bar generator, Time Code settings, Image Stabilizer on/off, Zebra mode, and audio input selections.
Once again, these controls can be operated by feel without ever taking the camera away from your eye. The shutter speed is displayed in the viewfinder, along with F-stop and focus distance. The time code can be set to either free run or to advance only while recording. Free run is particularly useful in a two-camera shoot such as a music video, where you zero the TC in both cameras when you start, leave one camera running to record the audio and a full event long shot, and then use the second camera to start/stop on close-ups. The consistent time code between the two cameras will greatly assist in the editing. There is also a provision to synchronize the time code of multiple cameras over the Firewire connection.
The camera has the familiar image controls found in the current generation of high-end consumer and professional cameras. These include Chroma Level and Phase for subtle color palette adjustment, Detail Level for crisper or softer edges, Detail Coring for noise control, Color Temp for coarse color correction, Master Pedestal for controlling the range of blacks, Gamma for controlling the dynamic range curve, and Matrix for either subtly brightening colors or fine tuning the color curve for fluorescent lights, and Knee to control what happens to blown out whites. There's also a Skin Detail control, been referred to sometimes as "Barbara Walters Mode," which is effective at softening skin wrinkles. These settings are associated with one of six named Scene settings. These settings can be saved to an SD card. I'm already building up a little kit of SD cards with settings to match different shooting situations.
White balancing is a simple one-button push of the AWB button on the front of the camera. Be sure to carry a white card and you'll get great color. You can also save two white balance settings (A or B). There is also an Auto Tracking White feature to gradually change the white balance to changing conditions. I'm not a big fan of this feature but I can see the value. If you didn't bring your white card, there are two fixed settings for 3200K halogen light or 5600K outdoor light. Panasonic recommends that you periodically adjust the black balance. You do this while not recording by setting the white balance and then holding the AWB button longer to reset the black balance.
In addition to the image settings, the Scene settings also include setting the camera to Video Mode or Film Camera mode. When this is set to Film Cam and the Recording Format is set to one of the 720-line progressive settings (720P), then the Frame Rate can be set to a range of 12 through 60. For example, if you are shooting in 720/24p and the Frame Rate is set to 60, it's called "overcrank" and, when played back, your video is played in slow motion. If set to a low setting, such as 12, you will get an "undercranked" shot which plays back twice as fast as reality.
This feature is a hoot. Before I used it, I thought of variable frame rate as yet another in-camera gimmick like fades and wipes. However, I'm now a convert. Beyond the obvious super-smooth slow motion action shots, I found that a bit of slo-mo is very useful for getting nice steady handheld scenic shots. And a bit of undercrank makes for very dramatic action shots of, for example, skiers or motorcycle jumps or car chases. I tried some slow motion (overcranked) shots of the surf and snow during a recent blizzard. The interesting thing about these is that you don't notice during playback that they are not recorded at normal speed. Just seems like the waves are more dramatic and the snowflakes are more visible. I never realized how powerful changing the speed of non-people shots can be when done subtly. The terms, incidentally come from the days of manual film cameras, if you crank the film fast and get more frames per second then you have slow motion when it's played normally. The opposite happens when you undercrank.
I expected to have problems with a stroboscopic effect on pans, as I've seen when shooting at 24 on the XL2. Either I've been lucky so far or the Panasonic is just a lot better at 24 fps but my fast pans with this camera have been very pleasantly smooth.
Unlike some other HDTV cameras, which are optimized for 1080 interlaced video compressed to HDV recording format, the HVX-200 is optimized for 720-line progressive scan video recorded to DVCPRO HD. A major difference with the HVX-200 is that the output is recorded with far less compression than with the various HDV cameras. The HVX records at 100 mbits/second as opposed to 25 mbits/second for HDV. For a recording with little motion, the two approaches (HDV versus DVCPRO HD) will both give beautiful pictures. The advantage of Panasonic's approach lies with the ability to capture far more action in the shots. This difference can be graphically illustrated by showing a rapid pan shot with both cameras. Very often with HDV you'll see some breakup or pixelation in the image while the Panasonic video will be rock solid. This is the "satellite TV" effect, in that it's much like watching a football game on satellite TV in a snowstorm. Another advantage of the HVX recording method is that it records 4-2-2 color rather than 4-2-0 color sampling as HDV does. The practical result of this is that there is much more color information available for better color correction in post. Yet another advantage of DVCPRO HD is that there is no inter-frame (or temporal) compression. So editing is far less work for your computer. With HDV, your computer has to uncompress each compressed frame sequence in order to regenerate the frames for editing.
According to Panasonic, the HVX operates natively in 1080p mode, meaning that it is capturing 1080 horizontal lines sequentially (not interlaced). However, it does not record 1080p. The choices of recording formats with this camera are extensive. It supports nine High Definition modes (1080 or 720 lines) and twelve Standard Def modes (480 lines). Recording takes place in DVCPRO HD at 100 mbits/second, DVCPRO 50 (50mbits), DVCPRO 25, and DV. Both 16:9 and 4:3 aspect ratios are supported. I believe that this has more flexibility than any other camcorder regardless of price. I also believe that the horizontal resolution is as good or better than any other 1/3" CCD camcorder and most 2/3" camcorder. The only major limitations of this camcorder versus a $65,000 Varicam appear to be low-light performance, depth-of-field, and ability to change the frame rate while recording.
The HVX-200 records on P2 memory cards at its maximum resolution, streams over Firewire at 720 lines or below, or records normal miniDV tapes. The P2 cards are PCMCIA form factor cards which can be directly inserted into a laptop for accessing like a hard drive. The cards come in 8GB or 4GB size currently, although a 16GB card is rumored and Panasonic has estimates that 128GB cards will be available within the next couple years. With the 720/24PN setting, an 8GB card will hold 21 minutes of recording. The camera holds two cards and the cards can be hot-swapped without stopping recording. So with enough cards, or with a laptop or Panasonic's P2 Store, you can record indefinitely.
There's been a lot of discussion about the pros and cons of P2 cards versus tape. At 1080/60i your recording time without swapping cards is short, 16 minutes with two 8GB cards. For event photography this would appear to be a severe limitation. If you must have 1080i and you are doing primarily unattended shooting or don't want to deal with hot-swapping cards while shooting, then this is probably not the right camera for you. If you find, like me, that 720p looks at least as good as 1080i then don't worry about the record time. Swapping cards works just fine and you always have the option of direct recording to hard drive via Firewire. If you don't want to make the investment in at least two or three 8GB P2 cards, then I don't recommend the camera unless you are planning to record only via Firewire or you are going to use the camera as an SD camera until you can afford the P2 cards.
Transferring the cards to a G4 Powerbook is a pleasure. From Final Cut Pro you select "Import... Panasonic P2" from the File menu. A window shows you each clip and you can select which ones to import. I've found that I can "capture" a couple hours of video in less than a half hour. Surprisingly, the P2 Store appears to be a bit slower copying but still is fast enough to have the card ready for recording by the time you'll need it.
My shooting mode with this camera is to stick with 720/24PN recording mode going to the P2 cards. This maximizes my recording time, lets me take advantage of over- and undercrank, lets me stream simultaneously to Firewire, and gives me beautiful softer film-like video. I also shoot with Cine-Like-D Gamma because I prefer an extended dynamic range with a bit softer saturation. You can call it Film Look versus Reality TV, or Erotic versus Graphic depending on your market. Mastering the Scene settings is clearly the longest learning curve with this camera but has a big payoff in achieving the results you want. With your personal Scene kit on SD, you'll never need another lens filter (except maybe a polarizer).
One caution when recording in Cine-Like Gamma: There's expanded dynamic range but Knee is disabled so there's nothing to prevent blown-out highlights. Be sure to turn on the Zebra and keep a close watch on the highlights.
The HVX-200 is capable of recording fantastic audio. While recording onto P2 Cards, the camera always records four channels of 16-bit audio sampled at 48KHz. Two of these are XLR inputs for external mics and two are the onboard mic. Phantom power is available for the XLRs. The A/D conversion and filters are excellent. My only gripe is that you can only set and view the levels on channel 1 and 2. So to get 4 useable channels, you need to set your levels for channel 3 and 4 and then adjust your input levels for 1 and 2 externally if possible. There should at least be some sort of a level balance in the Menu items.
The headphone output can be set to either input or frame-delayed recorded output. You may find the latter annoying, as you'll hear the output as an echo of reality. I use Bose noise-canceling headphones so I don't hear anything but what's going to tape. For playback, the camera speaker is surprisingly loud. At a recent shoot, I reviewed a shot and had the whole room turn to look for the boom box culprit.
Shooting with this camera is a wonderful experience. It's a sturdy, well-thought-out machine that lets you quickly adapt to changing situations. For the manual shooter, everything is in the right place, easy to use, and visible in the viewfinder. The pictures you take will be mind-blowing. Which brings up another important consideration of shooting with this camera or with HD in general. This is an unforgiving medium. Focus, motion, color, lighting are all much more critical than with SD broadcast recording. Lighting is especially critical with 1/3" CCD cameras since the light sensitivity is less than with 2/3" cameras or some DV cameras. Bring lights or find light. Your available low light shots may be disappointing.
Focus and camera motion are also more critical. I am not a steady camera handler by nature. I use sticks as much as I can and I use a Fig Rig coupled with an attached monopod for most of my "handheld" shooting. This works for me. Although I find the HVX easier to hold and better balanced than the XL2, the HD output puts a much greater demand on good shooting. This is a hefty camera at almost seven pounds with battery. It supposedly just barely works on a Steadicam Merlin if you paste a couple quarters on the counter balance. I recommend getting a sturdier tripod than you might use with a DVX100 or XL2. I had been using a Libec M20 with my XL2 but for the HVX-200 I've acquired a much sturdier Manfrotto 3182, 510 head, and the previously mentioned 522P control arm. One nice feature of this setup is that I have a compatible quick release on the tripod and Fig Rig.
The HD Revolution has reached critical mass. The demand for high-definition video is growing dramatically and the ability to provide HD can provide a significant competitive edge to the independent producer. Of the under $10K high-definition cameras that have been introduced, the HVX-200 is in a class by itself. It is better compared to the $65K cameras that are its genetic heritage. After shooting with this camera for a couple weeks, I don't want to go back. It's the first video camera that I've used that gives me the kind of image quality that I have cherished in film. It's also the first video camera that I've used that gives me the ergonomics, engineering and construction of the very best still cameras.
© Bill Southworth
|
|
Back to March 2006 Contents
|
|