 |
→ February 2007 Contents → Column
|
Compression Session:
How to Tame Those Flickering & Vibrating Still Photographs in FCP February 2007
|
 |
|
This month, Compression Session takes a detour into a problem of national security that has been on the minds of many.
Yes, we’re talking about those flickering, vibrating, swimming stills in Final Cut Pro.
Still photographs are not supposed to vibrate when you look at them. Often, the multimedia editor finds this happening in detailed photographs that usually are moving within the frame – commonly known as a pan & scan. Years ago this technique was done on a huge flat table with a video camera rig overhead, with a very skilled operator actually shooting a print, moving the camera, or zooming the lens to get the desired effect and bringing still images to life - also known as the "Ken Burns Effect."
The good news is those days are over. The bad news is – well, there's some tech stuff you gotta know before just slapping those pictures on your timeline.
I'm going to make this simple – your photographs are much higher resolution than a computer screen or video monitor. Using an image with a resolution that's too high for your screen to reproduce causes the flickering. The more minute the details in your photograph, the higher the odds are that the apparent vibrating will occur.
What's an editor to do?
First, you must prep your photographs for FCP in a manner that will decrease the flicker and give you a fighting chance. I'm shooting HDV these days so the actual size of the video is 1440x1080 at 72dpi, which is 4.4.5MB. I size the photographs to 1800x1350 pixels so I can pan in on them, but insuring that file size is not too large. I only make the image size larger if I have to zoom in really far onto the image. You can create a Photoshop Action that will size this automatically for one image or a folder of images.
Second: The images you create in Photoshop have square pixels and need to be changed to rectangular pixels for viewing in FCP, on an LCD monitor and/or a video monitor. While not getting into the nuclear physics of this, let's just take care of that in Photoshop under Image>Pixel Aspect Ratio>HDV1080. Again, you can make an Action to do all this in one easy step.
Here's an Emmy Award-winning QuickTime movie of Pixel Aspect Ratio in action.
Third: DO NOT SHARPEN THE IMAGE! We all love nice sharp still photographs, but that does not translate well to the video platform and increases the flicker many fold.
So, now you've got your images on the timeline and some are still vibrating. You have a few paths to still-image nirvana in FCP. These are in no particular order, but one or more might work for you.
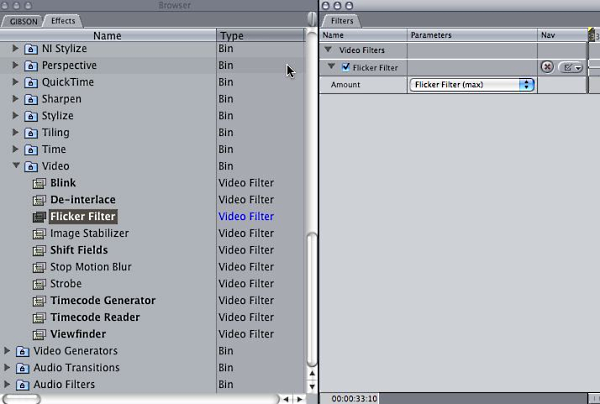
• Use the Flicker Filter, (duh!) found under Effects>Video Filters>Video>Flicker Filter. If you double click on the filter, you see the settings dialog box in the Viewer. This filter has three settings. I usually go for the Maximum right off the bat. Once applied, you'll need to render the clip.
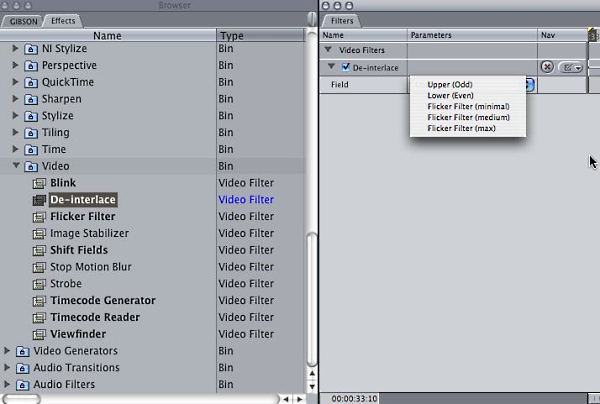
• Try the Deinterlace filter. Again found under Effects>Video Filters>Video>Deinterlace, this will take out one of the fields and may help. Try using the Upper Field first. Render the clip after you apply the filter and see if it's helped. If not go back and try using the Lower Field. You can also get to the Flicker Filter through the Deinterlace settings dialog box.
• Use the professional's secret weapon: The Gaussian Blur. WHAT? Are you nuts, PF? This goes against everything we are taught – you want us to BLUR the image? I thought sharp images are the idea.
Well, before you get in a tizzy, let me explain something. We are going to apply this in an EXTREMELY CONTROLLED MANNER. The Gaussian Blur filter is very powerful. Start off my using .5 for the Radius in the settings box. Be sure to hit Enter on your keyboard to set it. That's POINT 5, one half of one. As the filter is applied, you'll see you image blur in a horrible way – do not panic – it's just not rendered. Once rendered, you'll see that the filter has just toned down the edge details of the image, making it flow better on the screen.
At times, you might need to raise the Radius setting to 1 or even 2 or lower it to .2 depending on the image qualities.
This example sequence is a shot of Waikiki that is especially hard because of all the detailed lines in the hotels and water. I processed the photo four ways and they are labeled.
The movie will loop.
I made all of these 5 seconds with the same amount of zoom into the image. As you'll see even with the Blur, there's still some flickering in the hotels; however, it's toned down. The water flicker is pretty much eliminated. One tip: When making output for the Web in any format, be sure to check the Deinterlace option. It helps. I did not Deinterlace on these QTs on output so the true flickering is brought out.
You might want to download this and save it to your desktop to run smoothly.
I contacted FCP guru Larry Jordan for his insights into this problem. (By the way, larryjordan.biz is a great resource for FCP tutorials, tips and tricks. You can also subscribe to his monthly free e-mail newsletter that's filled with priceless information each month.) Here are his comments in full:
Since the beginning of time, NTSC and PAL users have had to deal with "flickering" on still images. This flickering is caused by the technique of overlapping two fields of visual information to create a complete frame. Each field is made up of horizontal lines - the first field contains all the even lines and the second field contains all the odd lines.
I hope this has been of service to everybody and if there's some technique you have which works better, please e-mail me and I'll share it with our readers. I'm always up for learning new tricks.
[NOTE: Due to a heavy work and travel schedule in the next few weeks, (including teaching at the wild & crazy Platypus Workshop), "Compression Session" will be taking a month off; I'll be back for the April issue.].
© PF Bentley
|
|

Back to February 2007 Contents
|
|