|
|
Last month we covered the basic three-light interview setup. This time around I thought we'd tackle lighting for other applications. Occasionally you'll encounter the need to photograph someone at a podium. There is a simple, but effective two-light technique that works very well for these situations. Pick the point, or the side, where you'll place the camera, and stick to it (you don't want to "cross the line" of continuity, else you'll confuse your poor viewers). Set up your key light so that it illuminates the side of the face away from the camera. Set up a fill light on the same side of the "line" as the camera. This will give your subject definition and visual interest. Both lights should be out of the way of the audience. If your camera is around to one side of the podium (rather than straight on) you'll also get a nice "rim" effect. Use your remaining fixture(s) to light the background and/or the audience. Let's say you're shooting a meeting in a smallish-room that is illuminated by overhead fluorescents. And let's say you want to brighten up the scene a bit. You can always use direct light on the subjects, but you run the risk of having all sorts of ugly shadows (including your own, when you move in front of a light). I often set up a couple of open-face fixtures and simply bounce them off the ceiling. This will raise the over-all illumination half-a-stop or more, and makes white balancing easier. If this room has windows that are letting in substantial amounts of daylight, take care about mixing your light sources. Indoor fixtures are typically 3200 Kelvin, and daylight is 5600 Kelvin. If you're balanced for indoors, the mix of daylight will usually (but not always) add an annoying blue tint to the scene. If you try balancing for the daylight, the warmer interior lights will add orange to the scene, which is just as bad, if not worse, than the blue. You can try to find a happy medium between daylight and tungsten with your camera's white balance circuit, or you can try gelling your lights with Full Blue or Half Blue to cool them down. If you are asked to shoot in a large, dim hall, well, unless you take along some big lights, you're probably going to be out of luck. I'll never forget walking into a meeting room in Washington that a CBS Lighting Director had lit with four "trees" of 1000w PAR lights. As I was setting up, he was walking around the room measuring the illumination. He came over and said, "Well, the whole room is a 5.6, except one place where it's only 4.5." The room was uniformly lit, and looked as flat as a white sheet against the snow. How I wished for something more interesting. If you encounter such a space and don't have an LD with bins full of PARs, you might try lighting just a small area, or you may have to use what the Brits call a "hand-basher," better known as a portable light. I hate these things, but sometimes you just have no other choice. If you do end up lighting the whole room, one technique is to put a light in each corner. You lose some definition, but at least you'll be able to see your subjects. If you're setting up outdoors and want to throw some fill light on your subject, unless you have some 1200w HMIs it's usually best to use a reflector. The Flex-Fill-style is easy to carry and versatile. It folds into a compact disk and opens, literally with the flick of a wrist, into a roundel ranging from 18-48 inches in diameter. I prefer the ones which are white on one side, silver on the other. You can also get them in gold and black. I think this is a true story: a British cameraman got the idea for these when working in China. He saw people working in the rice fields wearing round hats. Upon closer inspection, he was amazed to discover the hat folded up, figure-eight-style. The secret was a piece of thin, flexible bamboo. When he got back home he tried making one, but used a spring-steel band instead. The rest is, as they say, history. A sheet of foamcore or poster board can also be pressed into action. And if all else is lacking, any white material can be used (even a newspaper). You can also use this technique to add interest to a still-life or 2D art. Uniform illumination is simply not interesting. By breaking up the scene with light and shadow you'll get a much more pleasing effect. If you ever have to shoot someone in silhouette, take great care. The best method is to light only the background. Then set your camera's iris to expose for the BG, striving for a minimum of a three-stop difference between foreground and background. Check the scene on a monitor with the brightness turned all the way up. If you see any recognizable features on the subject's face, boost the BG light. Next time we'll take a look at some special lighting tools, like HMIs and the Dedolight used as a pattern projector. Happy New Year! Steve Smith
|
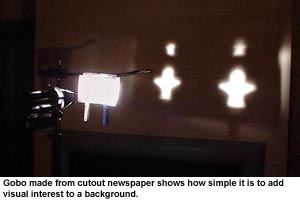 Speaking
of newspapers, here's a neat technique you can use to add interest
to your interview backgrounds. Take a one page section of the paper.
Fold it in half, then in half again. Then take a pair of scissors
and cut a pattern into the thickest edge. When you open the paper
again you'll see that the pattern is repeated several times. You
now have a "gobo." Hang it about a foot in front of your
luminaire and watch how the lighted pattern transforms the background.
If that sounds a lot like making paper dolls, well, it is. Exactly.
Speaking
of newspapers, here's a neat technique you can use to add interest
to your interview backgrounds. Take a one page section of the paper.
Fold it in half, then in half again. Then take a pair of scissors
and cut a pattern into the thickest edge. When you open the paper
again you'll see that the pattern is repeated several times. You
now have a "gobo." Hang it about a foot in front of your
luminaire and watch how the lighted pattern transforms the background.
If that sounds a lot like making paper dolls, well, it is. Exactly.