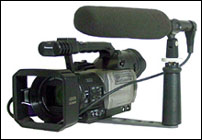
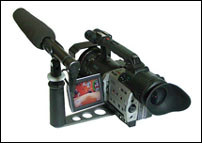
| VIDEOSMITH
PANASONIC DVX100 Camcorder
November 2002
by Steven Trent Smith |

|
Way back in
1995, Panasonic introduced an amazing camcorder, the miniDV-format,
three-chip EZ-1. I tested it late that year and was very impressed by
its image quality. I’d never seen such great-looking pictures
from a camera so small. Of course, a lot of that had to do with the
DV digital format. Now, we’ve seen a quantum leap with the introduction
of Panasonic’s DVX100.
 This
is not just another miniDV camcorder. Sure, it has all the features
we’ve come to expect in three-chip cameras, but the DVX is unique.
It will record both normal interlaced video, and progressive scan as
well. Let me explain. This
is not just another miniDV camcorder. Sure, it has all the features
we’ve come to expect in three-chip cameras, but the DVX is unique.
It will record both normal interlaced video, and progressive scan as
well. Let me explain.
“Normal” video in the U.S. has, until recently, meant 525
interlaced lines scanned at the rate of 30 frames a second, each frame
being made up of two fields, therefore, 60 fields per second. A number
of those scanning lines are used for “blanking” the
black frame around the picture. The actual number used for picture information
turns out to be 480. In today’s digital world, what we used to
call just plain “five-two-five,” is now known as (or 60i
for short).
Still with me? What makes the Panasonic DVX100 so different is that
it will record in two other modes: 480p/30 and 480p/24. The “p”
stands for progressive scanning, which means that the image is written
one complete frame at a time, not interlaced. And the 30 and 24 stand
for the frames per second rate. Thirty is already familiar to us, but
24? Ah. Twenty-four is the rate at which motion pictures are shot and
projected (at least in the United States). So what Panasonic has done
is to introduce a miniDV camcorder capable of recording at 24 frames
per second. Why, you might ask? If you shoot video at that frame rate
the resulting image, even when played back at 30fps, will look a lot
like film. And to a large number of people in the world, that matters.
 You
probably won’t want to shoot news at 24p, but what about a documentary?
To shoot a one hour 16mm film would cost a small fortune. But what if
you could shoot miniDV tapes, at five bucks a pop, and have the end
product come out looking like 16mm? That’s a pretty cool trick.
And that’s just what the DVX100 does. You
probably won’t want to shoot news at 24p, but what about a documentary?
To shoot a one hour 16mm film would cost a small fortune. But what if
you could shoot miniDV tapes, at five bucks a pop, and have the end
product come out looking like 16mm? That’s a pretty cool trick.
And that’s just what the DVX100 does.
So, let’s run down some of the specs.
The DVX weighs in at 4.2 pounds. That’s about two pounds less
than its Canon rival, the XL1S, but a pound heavier than Sony’s
contender, the PD150. While the Panasonic looks sleek in the advertising
photos, it is in fact a bit chunky. The right-side handgrip is comfortable
at first, but I did notice some palm strain after prolonged use.
The DVX100 has native progressive scan 410,000 pixel chips. In comparison,
the XL1S has 270k chips and the PD150 has 380k. In low-light, the Panasonic
claims 3 lux, while the PD150 says 2 lux (as does the XL1S, but that’s
at 1/8th shutter speed setting).
Like most miniDV cameras, the DVX has controls and features stuck all
over the place. Let’s start on the left side. There is a very
bright, sharp 3.5” swing-out LCD viewscreen. Underneath the screen
are several buttons, including counter set and reset, mode check, zebra
control and optical image stabilization on/off. The zebras are a neat
feature. Like many “big” cameras, the DVX has two zebra
settings, both of which can be set independently at increments from
80% to 100%. I like to set one at 80%, for faces, and the other at 100%,
for all highlights. Think of the zebras as your exposure meters. The
Optical Image Stabilization is good, and will smooth out some of the
high frequency bumps and shakes.
Above the LCD is the all-important menu selector. Tap the Menu button
and either the “Camera” or “VCR function” menus
appear on the LCD or in the viewfinder. To adjust the menus, there is
a small joystick-like selector that moves up/down, right/left. You use
that to navigate the menus, and when you make a selection, you push
the little controller down. I won’t get into the menus just now,
but suffice it to say, they are very extensive. When the camera is in
the VCR mode, the joystick is used to control tape play, fast-forward
and rewind.
Close by is the speed selection button. Standard shutter is 1/60th.
You can also choose 1/100th through 1/500th or Synchro Scan, which allows
you to synchronize the DVX100 to computer monitors, in tenth of a second
increments. It’s too bad that the camera does not have a lower
speed range. The blurry effect you get when working at 1/8th-1/15th
on other cameras can look pretty cool.
Below the LCD screen are the two manual audio pots. They are protected
from accidental bumping, which is a nice feature. I would not try to
ride audio with these while rolling tape. Preset them and you should
do just fine.
Moving along the left side, we come to the lens controls. The Iris button
switches between manual and auto iris. Next to it is the Iris dial.
As you turn it, you’ll see the f-stops change on the screen/viewfinder.
Forward of those is the three-position Gain switch: L, M, H. Each of
these can be set in the menus, from 0dB to +12dB. The higher gains do
not add much noise a nice feature. In this cluster pf buttons is
the White Balance switch. You have a choice of two user settings, A
and B, or the preset (3200K or 5600K). This dual setup helps when you
have move from, say, outdoors to indoors. You can change the color temp
with the flick of the button. You could also use the Auto Tracking White,
but I generally stick with a fixed balance for consistency sake. The
Auto White Balance set button is on the front of the camera.
Nearby is the neutral density switch. The DVX100 has three settings,
Off, 1/8th and 1/64th.
Above those is the Focus switch, letting you hop back and forth between
auto and manual focus. To my taste, the auto focus is a bit slow. And
the manual focus is, in common with all cameras of this class, hard
to use accurately. Panasonic has added a “focus information display,”
ostensibly to help you manually focus. But instead of displaying something
useful like feet or meters, it gives you a percentage from infinity
(99) to macro close (00). I still wish somebody would reinstate the
system Sony used in the VX-1000, with a pair of triangles and a circle.
The former indicated whether you were too close or too far, and when
the latter went solid, you were in perfect focus. Ah well.
User1 and User2 buttons permit you to preset up to nine different functions,
to personalize the settings.
Let’s move on to the back of the camera. On the right is the power
on/off switch and integral record start/stop button. Above that is the
Eject button, which will do its thing even with the power off. When
you flip up the viewfinder, you’ll find the battery compartment
and a separate 7.9v DC input. To the left, on the bottom, is the Camera/VCR
button. This thing scares me a bit. When you hit it, the DVX switches
from camera mode to playback mode. And it’s pretty easy to hit
accidentally. I wish Panasonic had put some sort of protective surround
around the button to prevent dumb things from happening.
Above that is the Scene Selector Dial. This is a pretty cool control.
It allows you to just dial in preset shooting modes. The six positions
have factory-set defaults, but you can go in and change them if you
like. Four of the settings are for shooting 60i, and two are for shooting
24p. The final control on the rear is the End Search button. There is
also a covered connector panel, with jacks for LANC and headsets.
Let’s go to the viewfinder. I like it. It’s quite large,
and has a substantial rubber eyecup. It will swing up to ninety degrees
vertical. There is a diopter ring on the bottom for personal eyesight
adjustments. The viewfinder employs a color LCD, with control only over
the brightness level. I wish you could adjust the color level too. The
viewfinder is bright and sharp, though I’d have to say the swing
out LCD viewscreen looks sharper.
At the back of the camera’s handle is a rear tally light and rear
remote control sensor. On top of the handle are controls for the zoom
and start/stop. There is a plain (not hot) accessory shoe and a decent
quality stereo microphone that works well for picking up ambient sounds.
On the right side of the DVX100 you’ll find the cassette loading
door. This does not seem as robust as it might. Above that is the main
zoom control rocker and the Rec Check button, which lets you playback
the last few seconds. The Panasonic also features manual zoom (the button
is under the lens). You’ll need a deft touch to make it smooth.
Both finder and viewscreen have zoom range indicators. Unfortunately,
they do not show focal lengths, but, like the focus scale, show the
position in percentages. Make a note that above 70% the macro close-focusing
does not work.
That about does it for controls, though I’m sure I’ve left
out something.
Let’s talk about the menus.
The DVX100's menu system is extensive and curiously intuitive to use.
The first menu to appear, when the DVX is in Camera mode, includes basic
setup items: Scene File, Camera Setup, SW Mode, Auto SW, Recording Setup,
Display Setup and Other Functions.
Let’s say you want to set time code. Open the menu. Use the joystick
to scroll down to Recording Setup, click the button. Now you are presented
with a second level of menus items. Scroll down to TC Preset, click
that. You can then enter the time code number you’d like to start
with. You also have the luxury of entering User Bits (like dates and
times that you don’t want to burn into the image). If you’d
like to change one of the Scene Files, go into that menu and you’re
presented with thirteen items, among them: Detail Level, Master Pedestal,
Gamma, and Progressive or Interlaced mode.
Interval Recording for timelapse work is available through the menus,
and bringing up color bars requires just a click, a scroll and a click.
The menus seem daunting at first, but once you get the hang of them,
setting or resetting moves briskly.
The lens on the DVX100 is a Leica Dicomar 4.5-45mm, f1.6 zoom. The 10x
range seems a bit limiting the PD150 has 12x and the XL1S has 16x.
But what the Dicomar lacks in range it more than makes up for in sharpness.
I was very impressed at how well this lens resolves at all focal lengths,
and with minimum distortion. Panasonic calls it a “wide-angle”
zoom, and to an extent, that’s true. Canon’s 16x starts
at 5.5mm, and the PD150 at 6mm, so the DVX100 is, indeed “wide.”
Still, Panasonic will be bringing out a wide angle adapter in the next
few weeks (as well as an 16:9 aspect conversion lens). The front ring
on the Dicomar is an impressive 72mm.
The audio features on the DVX100 are well thought out. You can easily
switch back and forth between manual and auto. The Audio Limiting Circuit
is not one of the annoying hunt-and-seek types, but seems to be a true
limiter. There are a pair of XLR connectors at the front of the camera.
These are mounted too close together, so it’s hard to get plugs
into them. The best solution we found was to use one right-angle XLR
and one straight XLR. Phantom powering (48v) is available to each input.
Audio level is shown on both the screens, in two colors no less. Remember
when recording digital audio you want to set your levels to -20dB, because
any time you go into the red, your sound will distort and there’s
no way to recover it.
Panasonic includes a microphone mount with the camera. It fits onto
the right side of the handle. You can install most any mic you want
(my preference is always the Sennheiser ME-66 short shotgun). But there
is one problem. Both the onboard camera mic, and the external mic sitting
in the Panasonic mount, pick up the noise from what has to be the loudest
zoom motor in this genre of cameras. Your best bet is to move the external
microphone away from the camera (stick it on a bracket, like Videosmith’s
Mini-Rover).
Ya wanna shoot filmstyle, eh? Okey-dokey. Here we go.
Rotate the Scene File dial to position F5. The camera will think about
that for a few seconds, then reconfigure itself. When the viewfinder
comes back up you’re going to see a darker picture than the one
you just left, and you’ll see flickering. That’s because
the camera is set to record at 24 frames per second in progressive mode.
When you play the tape back, an internal 2:3 circuit adds six frames
and converts the image to 60i. FYI DVX100 tapes recorded at 24p
can be played back on any miniDV machine.
There are some limitations when shooting with the DVX100 in progressive
mode. You cannot display color bars. You cannot increase the gain setting
for low light situations. You cannot auto focus.
When played back, the images at the 24p setting do look film-like, but
there is an annoying jerkiness to the picture. The mode I like better
is reached through the F6 setting on the Scene File dial. This puts
the DVX100 into what Panasonic calls 24p Advance Mode. The conversion
system works differently, seeming to smooth the motion out, and make
the resulting image look remarkably like 16mm film. Unfortunately, the
instruction book does not go into sufficient detail about the differences
between these modes for me to explain them better. Sorry.
The DVX100 has all the usual inputs/outputs, including IEEE 1394 (Firewire).
It does not have a still photo mode.
To be quite honest, I’ve never been a big Panasonic fan. But they’ve
outdone themselves with the DVX100, and they’ve converted me.
I’m very happy with this camera, and so, too, are our clients.
Videosmith has one in rental, and a second coming in a couple of weeks.
The DVX100 is quite an achievement, and will become the new benchmark
among three-chip miniDV camcorders. If you’re in the market for
a top-quality camera, do give this one a close going over.
© Steven Trent Smith
http://www.videosmith.com
stscam@bellatlantic.net
Steve Smith is a cameraman for CBS News and 60 Minutes.
He and his wife, Martha, founded Videosmith, a Philadelphia-based company
that sells and rents professional and consumer-level video equipment.
|